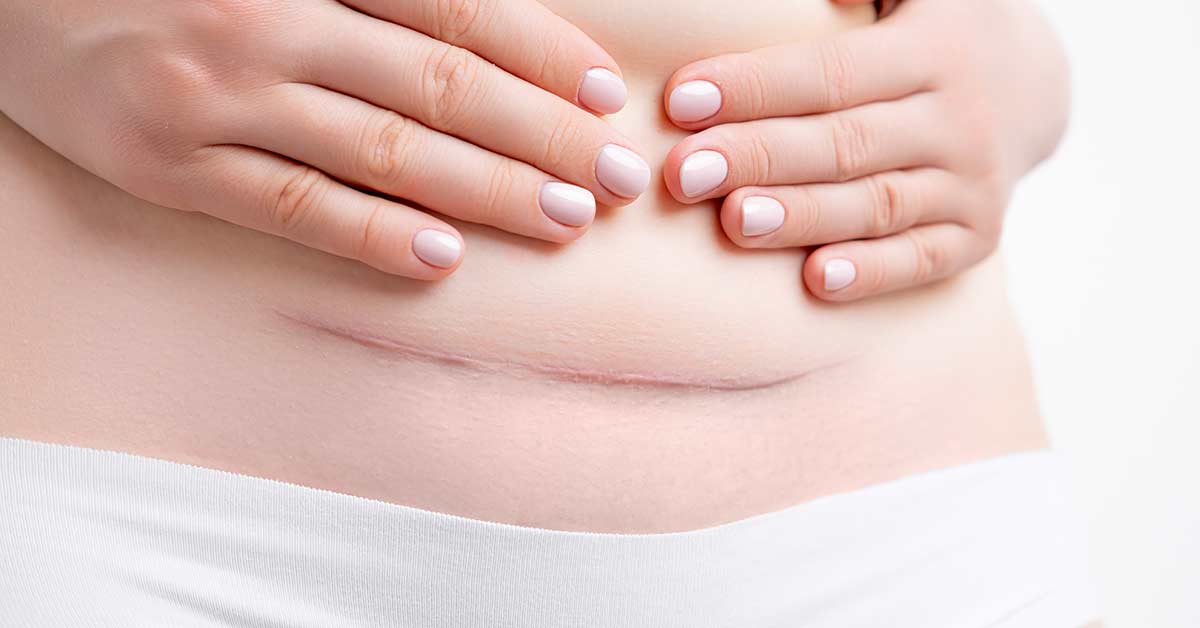
If you've had a C-section and you're wondering when you can start ab exercises, which movements will be safe, or why your core still feels disconnected weeks, months, or even years later, you're asking all the right questions.
C-section recovery is more complex than it appears from the outside. The path back to functional core strength depends on understanding what was cut, how tissues heal over time, the role of scar mobility, and how to progress exercises in a way that supports your body.
This guide walks you through the full picture: the healing timeline, scar work, the breathing foundation your core depends on, and a phase-by-phase program for rebuilding abdominal strength after a C-section.
Free printable guide: The C-Section Rehab Roadmap
Why C-Section Recovery So Long
Recovering from a C-section is different from healing after a vaginal birth. Not only are you recovering from pregnancy, but you also underwent major surgery.
The incision needs time to heal along with progressive abdominal exercises to help rebuild connection, restore strength and mobility, and remodel the affected tissue.
ABDOMINAL FASCIA STRENGTH AFTER BIRTH
51–59%
of its original tensile strength at 6 weeks
73–93%
strength reached by 6 to 7 months postpartum
Source: Bø et al., 2017.
Your 6-week clearance is a milestone, but it’s not a finish line.
Research shows that abdominal fascia has only 51–59% of its original tensile strength at 6 weeks and it doesn't reach 73–93% strength until 6 to 7 months postpartum (Bø et al., 2017). Internal and external scar maturation can take up to 2 years as the body completes collagen remodeling and deep tissue reorganization (Olszewska et al., 2024).
This means the 6-week mark isn't a green light to return to all activities immediately. Jumping into traditional core exercises too soon, before the tissue has enough strength and thickness to handle load, can create problems instead of solving them. On the flip side, staying sedentary up to that 6-week mark can also affect function, healing, and mood. Both impatience and doing nothing in the early weeks tends to slow overall recovery. The goal is to encourage movement while respecting healing, so that by the 6-week mark, you are ready for the next transition.
→ Good to know
It’s important to recognize that even though you did not give birth vaginally, the rest of your body and your pelvic floor (more so if you had any active pushing in labor) were also affected due to postural adaptive changes and the weight of the baby. This means you might need to address other areas in your recovery beyond your C-section incision and abs.
A Note on Waist Trainers and Belly Binders
A belly binder or compression shorts can provide useful support in the early postpartum weeks, particularly at the incision site. This differs from celebrity-style waist trainers, which don't strengthen the core and may create problems by artificially holding the abdomen in and allowing the deep core muscles to become even less active.
When used appropriately, an abdominal binder acts as temporary "backup abs" to provide support during early healing. The goal is short-term support to make movement more comfortable and confident, and not longer-term reliance. Once you can maintain good core engagement during daily activities, gradually phase out the binder so your abdominal muscles can resume their role.
Proper Fit and Use
The binder should feel supportive (but not tight) and should not cinch the waist.
Use only during the early postpartum period, and gradually discontinue within the first few weeks.
Prolonged use can result in:
→ Increased pelvic floor tension and habitual abdominal gripping
→ Excessive core bracing, which may increase the risk of prolapse, hernia, or delayed healing of diastasis recti
Initial Lifting and Movement Dos and Don’ts
Whether or not it’s her first baby, the first few weeks after delivery can feel overwhelming for any mom. Here are some simple movement strategies that reduce strain on the incision and abdominal wall during this important recovery period.
FIRST 6 WEEKS
Do
- Brace your incision site with a pillow when sitting up, lying down, coughing, or sneezing to reduce abdominal pressure.
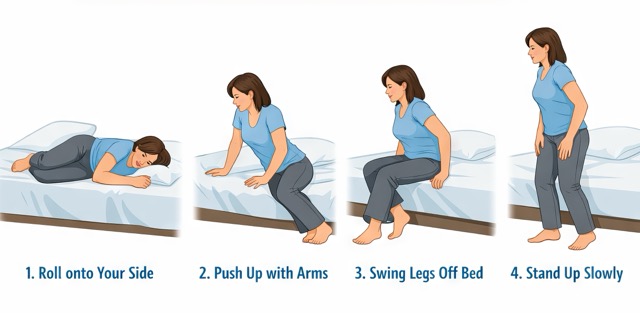
- Use the log rolling technique to get in and out of bed.
- Sleep on your side with a pillow between your knees, and avoid stomach sleeping until it feels comfortable.
- Keep frequently-used items at counter height to limit bending and overhead reaching.
- Maintain upright posture when standing to prevent prolonged slumping or bending during healing.
Don't
- Lift objects heavier than your baby. Needing to hold your breath or feeling discomfort when starting to lift something means it’s too heavy.
- Do heavy household chores like vacuuming, changing bed sheets, or carrying groceries.
Bowel and Bladder Basics After a C-Section
Postpartum constipation is very common, and it can be even more likely after a C-section due to the surgery and narcotic pain medications slowing digestion. That’s why hospitals often give stool softeners, which can be helpful to continue taking during early recovery at home.
Avoiding any straining during bowel movements is key in early recovery because excessive bearing down increases pressure on the C-section incision, pelvic floor, and abdominal wall.
Tips to Decrease Straining
The C-Section Incision: Its Effect on Your Core
The rate of intra-abdominal adhesion formation increases dramatically with each subsequent C-section. After a first C-section, the rate is around 7%. After a repeat C-section, that rate climbs to approximately 68% (Lubczyńska, Garncarczyk & Wcisło-Dziadecka, 2023).
Rate of intra-abdominal adhesions


Source: Lubczyńska, Garncarczyk & Wcisło-Dziadecka, 2023
Addressing scar tissue and mobility early, even if imperfectly, is far better than letting adhesions accumulate unchecked.
A C-section is not a single incision. The surgeon passes through several distinct layers to reach the baby: skin and subcutaneous fat, the midline fascia and linea alba, and then the peritoneum, uterus, and amniotic sac.
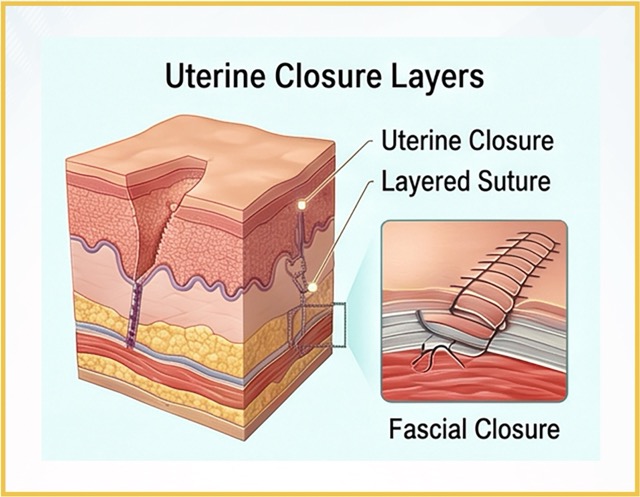
Not all of these layers are directly sutured back together. That means the body has to heal multiple layers at once, and those layers need to move independently for the core to function properly.
Think of it like plastic wrap that has been heat-shrunk together.
The individual layers can become stuck and lose their ability to slide and glide against each other. This internal restriction creates what feels like built-in resistance against your abs (making it genuinely harder to engage them) and contributes to a persistent lower belly pooch.
Limitations in mobility at each layer can affect not only core function and appearance, but also organ motility, position, and function, lumbar and pelvic movement, and nerve function. This can look like poor lymphatic flow and digestion, bladder irritation, urge and stress incontinence, constipation, restricted lumbar and pelvic mobility, pain, hypersensitivity, numbness, and pelvic floor heaviness.
Scar and Lower Abdominal Mobility Checks
Once your incision has fully closed and you’ve been cleared for scar mobility work, you can use these movements to check your scar mobility. Limitations can persist even years after a C-section, affecting function and contributing to pain and symptoms.
Direct Scar Mobility
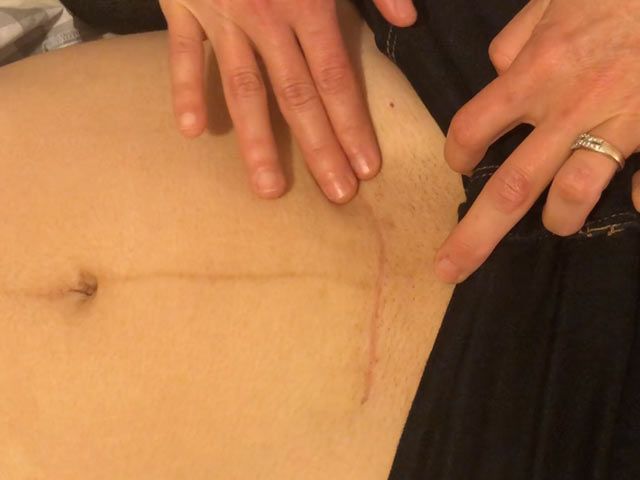
If you pull on your incision, it should move in all directions at every point along your scar. Limitations in any direction or location indicate an area that needs improvement.
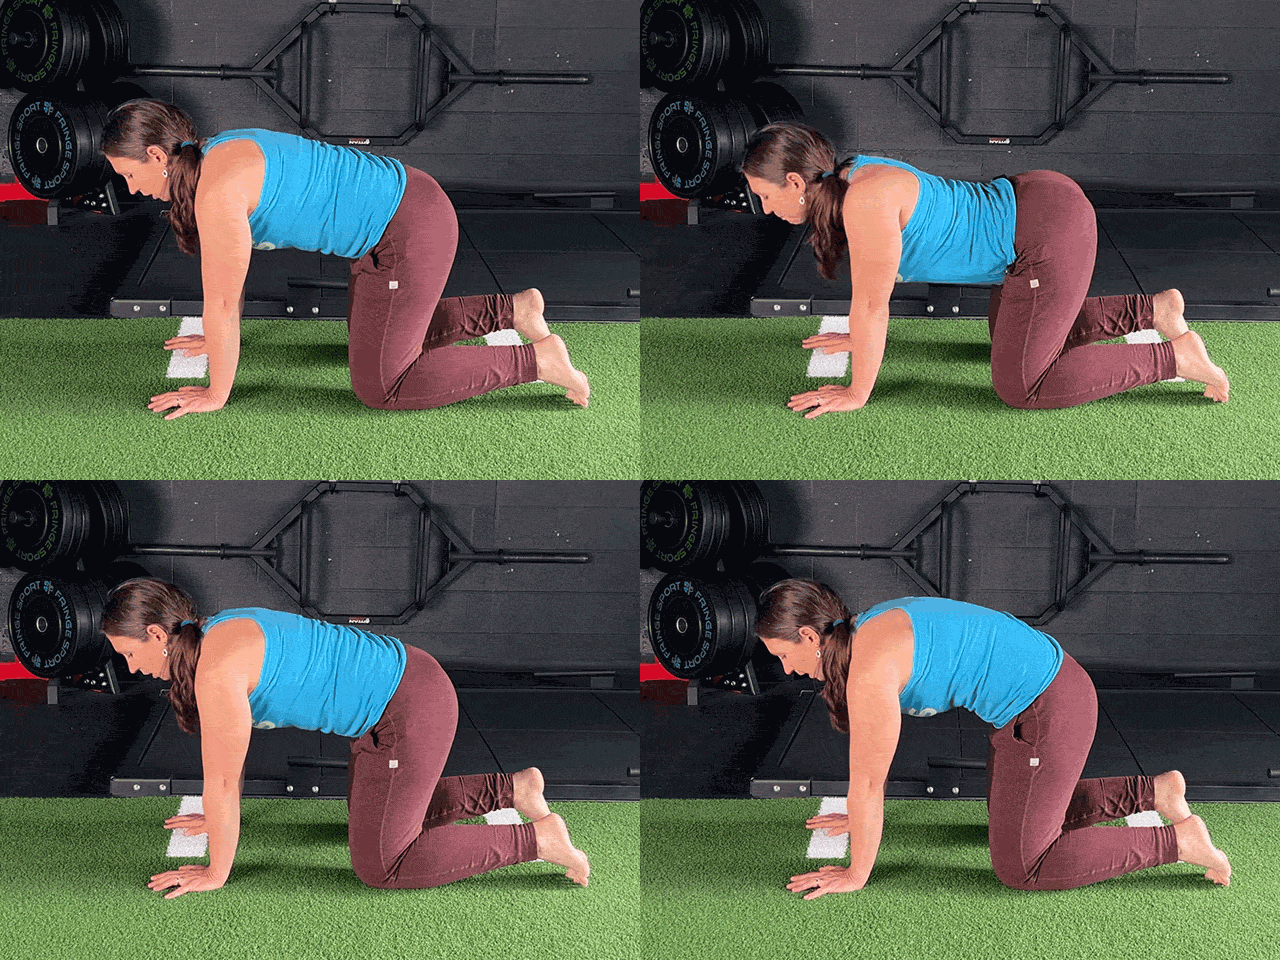
Segmental Cat-Cow
As you do this, pay close attention to what’s happening in your lower lumbar spine and pelvis. If moving into extension feels blocked or uncomfortable around the lower abdomen, this is a useful signal that deeper scar work is warranted.
Placing a band around the lower lumbar spine can encourage more movement and provide feedback to the area with limitations.
This will facilitate length in your lower abs to create a better place to engage from and provide additional feedback and resistance to improve core engagement and connection.
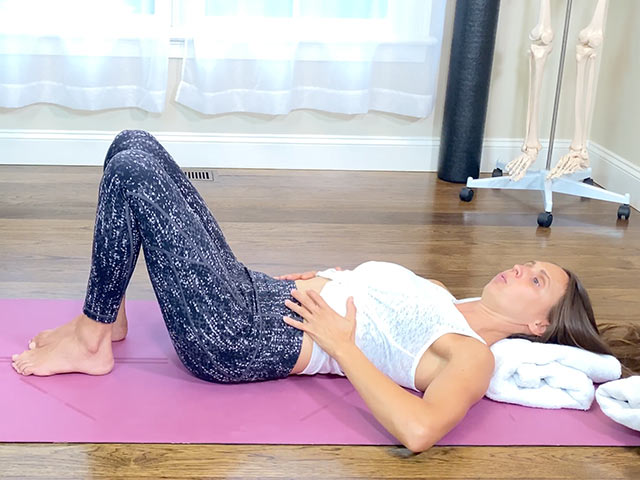
Belly Breathing
You can explore this while lying on your back or side. We don’t want all of the inhale to go down into your lower abs, but making sure some distention can occur indicates good tissue mobility. It can also be a gentle way to introduce mobility from the inside out during early recovery and help you build awareness of any tendency to hold lower ab tension during the day, which can affect breathing, bracing mechanics, and pelvic floor function.
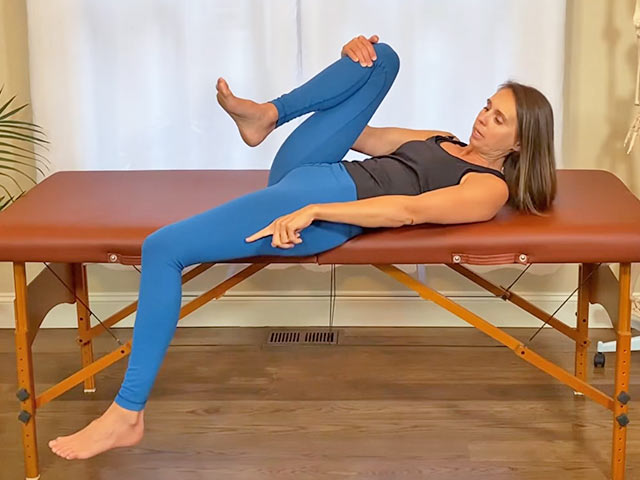
Thomas Test
This reveals anterior hip stiffness that can occur post C-section. Full range is your knee dropping straight down to just below the table and bent to 90 degrees without your back arching or pelvis tipping forward. If you feel specific tugging at the C-section incision, scar tissue mobility may be the more limiting factor than hip flexor stiffness.
Lower abdominal inhibition following a C-section is real and common. The surgery directly affects tissue mobility and nerve supply in that region, making it genuinely harder for the lower transverse abdominals and internal obliques to activate. This is why rebuilding core function after a C-section requires both progressive mobility and strength.
C-Section Scar Massage: When and How to Progress
Scar mobility work happens in stages, progressing from gentle desensitization to direct mobilization over the first several months. Even though the greatest changes in tissue remodeling will happen in the first year, it is never too late to work on a C-section scar as an important piece of your recovery.
Weeks 0–4
No Direct Scar Work Yet
In the first weeks, your job is to protect the healing tissue. Follow your doctor's lifting and activity restrictions carefully. Support the incision site with a pillow when you cough or sneeze, and use a belly binder or compression shorts as needed.
When getting out of bed, roll to your side first rather than pulling up through your abs. Don’t forget to pay attention to how you get into and out of chairs or lift your baby. Make sure you’re hinging at your hips and using your arms as needed to get in and out of chairs, and don’t lift the baby above shoulder height to support your healing abs.
Weeks 4–6
Desensitization Around the Scar
Once the surface incision has closed (verify this with your provider), you can begin desensitizing the skin around the scar, but not directly on it yet. Use a texture progression: start with soft cotton, then progress to denim, then wool, then Velcro. Gently stroke these textures over the skin near the incision, above and below it, in a way that feels tolerable.
This process helps to calm any hypersensitivity and begins restoring normal sensation in the area. Numbness, tingling, or tenderness are common reactions, and gradual exposure helps to normalize the tissue response.
Weeks 6–9
Mobilizing the Scar
After your doctor clears you for scar release work, begin gentle mobilization of the incision. Work the tissue up and down, side to side, and in circles, looking for areas that feel stuck or resist movement. The scar should eventually move somewhat freely in multiple directions and lift slightly when you pick it up between your fingers.
Consistency matters more than intensity here: daily or every-other-day work at a gentle intensity is more effective than aggressive but infrequent sessions. Monitor for lasting redness or discomfort after mobilization work, which indicates you were too aggressive.
Weeks 9–14 and beyond
Deeper Mobilization and Visceral Work
As mobility improves, you can progress to skin rolling and progressive lifting techniques that work deeper into the scar. For those who’ve had a difficult recovery, feel significant bloating or abdominal restriction, or are preparing for another pregnancy, referral for visceral manipulation at 4 to 6 months postpartum is a valuable standard recommendation. Abdominal and visceral massage, whether performed by a trained therapist or learned for home use, helps the deeper layers and organs regain mobility, so your abs can contract more effectively.
360° Breathing: The Foundation Your Ab Exercises Depend On
Before moving into direct ab work, it's worth understanding why breathing is an essential first step and not a warm-up you can rush through.
The diaphragm and pelvic floor move together on every breath.
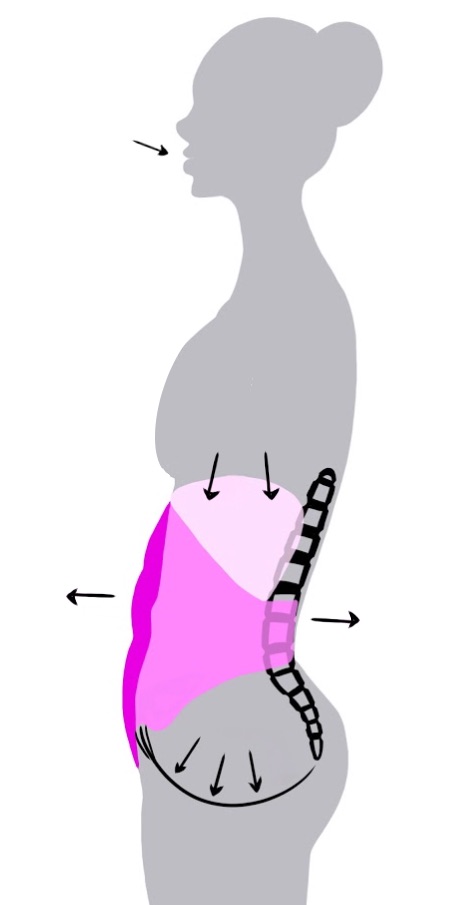
Inhale: your diaphragm descends, increasing intra-abdominal pressure and gently lengthening your pelvic floor and abs.

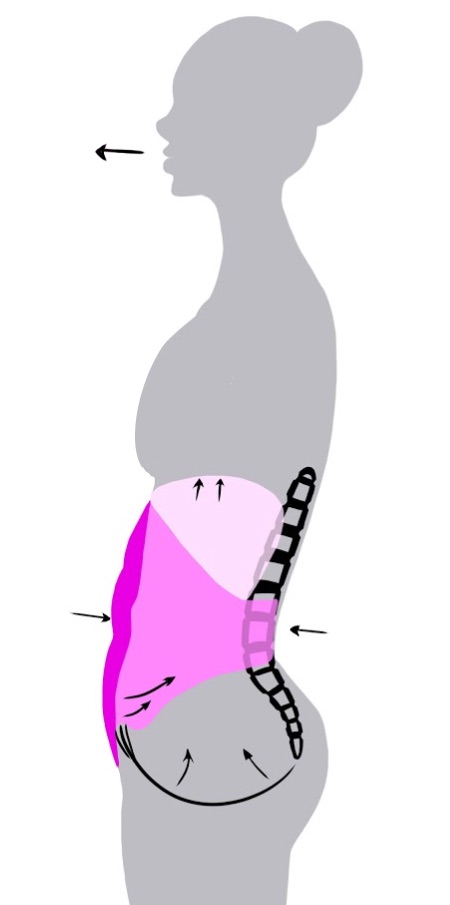
Exhale: your diaphragm and pelvic floor both naturally recoil upward.
This coordinated movement is the foundation not only for how we breathe, but also how we brace for balanced mobility and support throughout our system.
After pregnancy and a C-section, this system is often disrupted. Because the abdomen lengthens during pregnancy, the abs can’t provide as much spinal stability. The diaphragm and paraspinals then pick up the slack and overwork as postural stabilizers, making it difficult for the diaphragm to function as a primary muscle of inhalation.
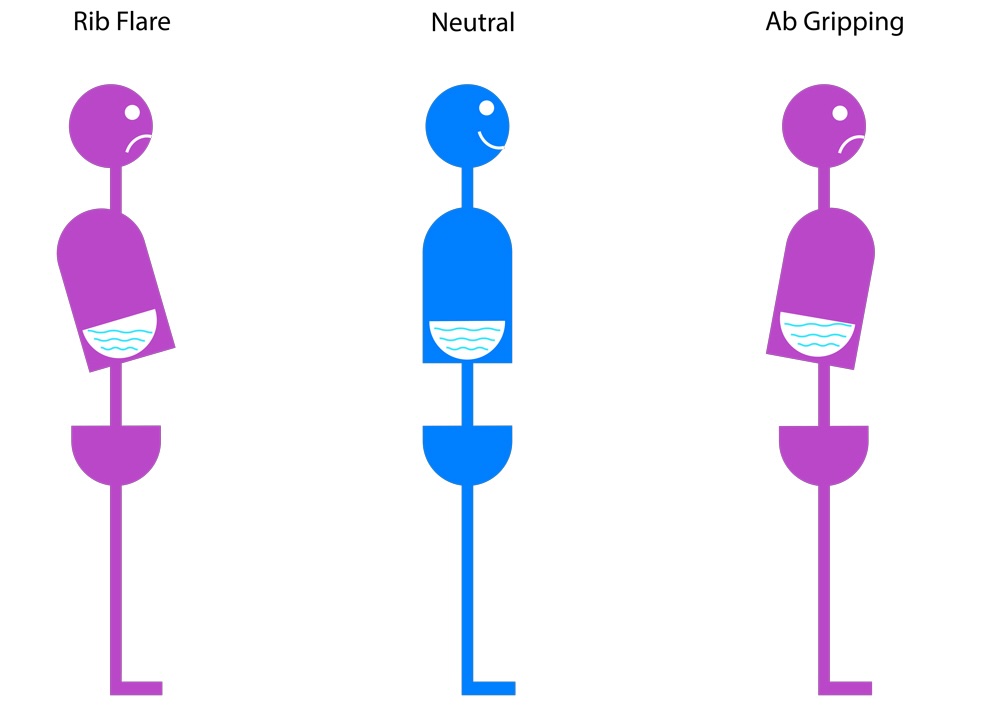
Pregnancy adaptations can also keep the rib cage stuck in a widened or flared position, with subsequent compression elsewhere.
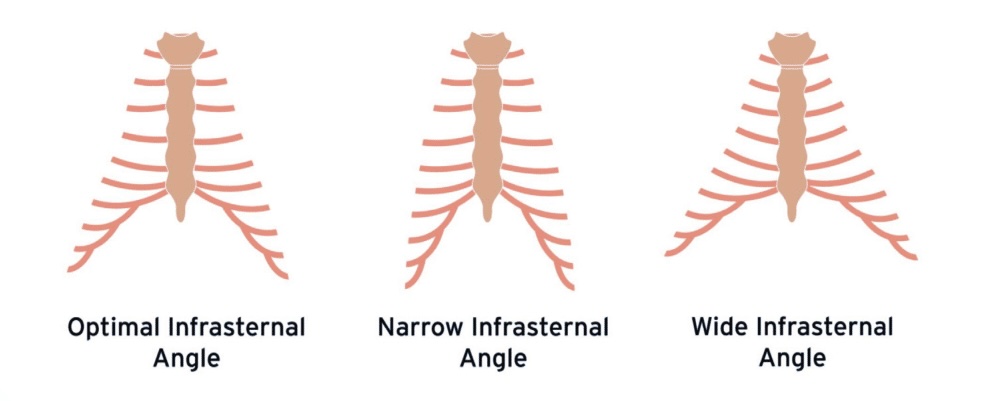
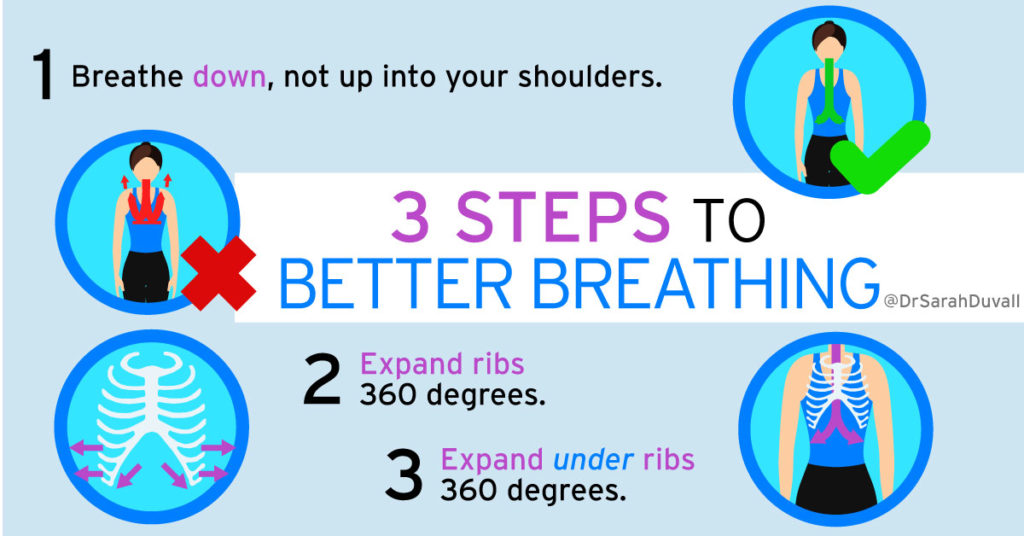
Poor rib cage mobility, lengthened abs, and a diaphragm not set up for success can feed into a negative feedback loop for continued proper breathing and bracing mechanics. If not addressed, the result is often a shallow or asymmetrical breathing pattern where the air goes up instead of down, or it fills one part of the thorax preferentially rather than expanding in all 360 degrees.
The 360-degree breathing pattern
The inhale expands equally into the sides, back, belly, and down into the pelvic floor. A relaxed exhale should be a natural recoil set up by the inhale, with the pelvic floor naturally lifting, abs flattening, and ribs coming back in as the diaphragm lifts up into the rib cage. This should occur without extra strain, noise, or effort.
This is the foundational pattern you’ll use for your bracing strategy in recovery, especially as you increase intensity and invite more active pelvic floor and core engagement (depending on the demands of the exercise or task at hand).
When you’re first working on repatterning, you might need to use intention and position to direct more movement into the areas of restriction, like your back or sides, and make sure your inhale goes down and not up.
On an exhale, if your upper abs are dominant, you might need to delay movement in your rib cage and upper abs to make sure you’re not immediately putting pressure down onto your pelvic floor.
In this instance, you might find that you need to encourage your pelvic floor to gently lift, your lower abs to gather and sink inward, and then allow the rest of your abs and ribs to naturally draw together as one unit.
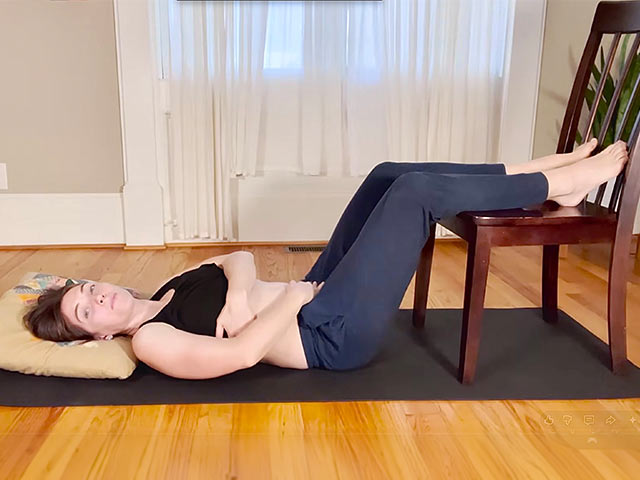
If your rib cage is wide and has a hard time coming in as you exhale, you may need to use your hands or props to help close the rib cage and restore your diaphragm and pelvic floor to their resting position. Either way, rib cage mobility drills(opens in new tab) can be great tools to help improve rib cage mobility in both directions and help you avoid overusing your upper abs.
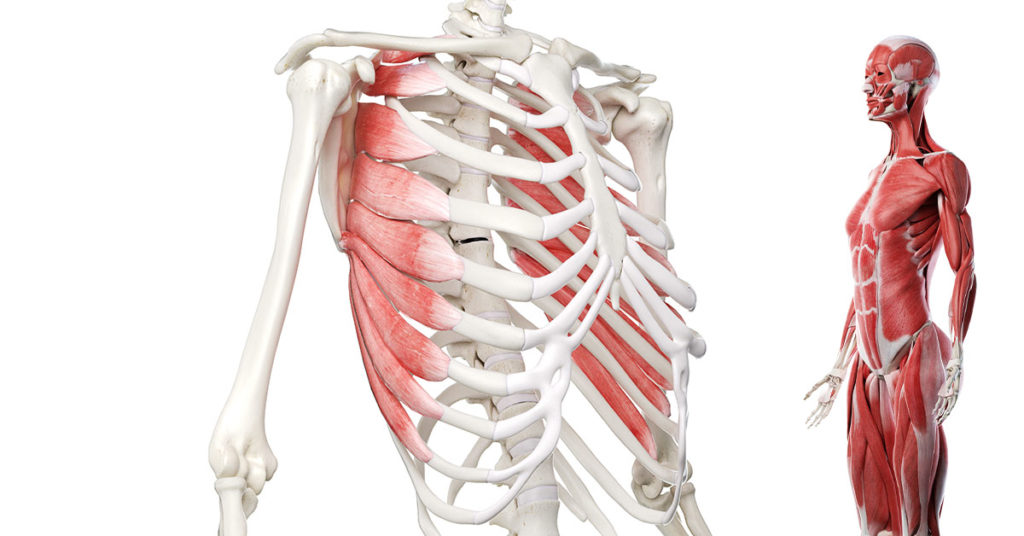
If you're early in your recovery, you can start breathing practice in the first two weeks as long as it doesn't cause any pulling or discomfort at the incision site. Start with slow, full inhales through your nose, and slow, full exhales using a "ha" breath (as if fogging up a mirror) to gently activate your intercostals without over-engaging your abs.
Ab Exercises After a C-Section: A Phase-Based Program
Progress through each phase based on your tolerance, healing progress, and exercise performance, not strictly by weeks alone. Check with your provider if you're unsure about timing.
The general rule: If an exercise causes lasting discomfort at the incision site that persists into the next day, reduce the intensity or return to the prior phase. Also make sure you feel your abs in the desired core exercises and demonstrate a balanced bracing strategy between your entire abdominal wall and pelvic floor. You should never feel any pressure down into your pelvic floor or notice excessive or hard doming anywhere along your linea alba (the midline of your abs).
Weeks 2–6
Phase 1: Indirect Core and Postural Foundation
At this stage, the goal is not to load the abdominal wall directly. Instead, we focus on restoring breathing patterns, activating postural muscles, gently introducing mobility, and beginning to reconnect your breathing and bracing system in a low-demand way.
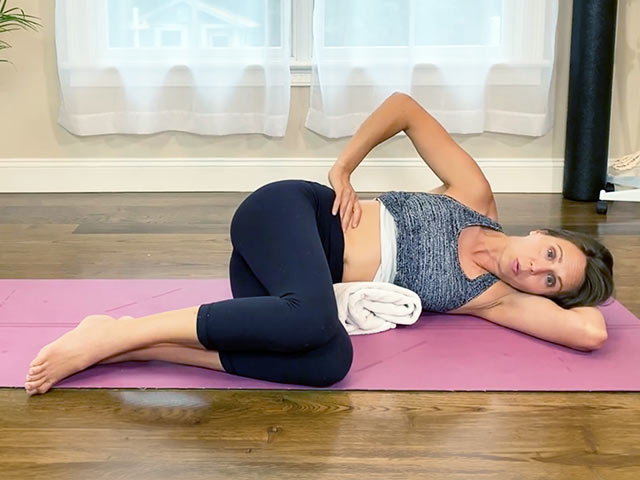
Side-Lying Breathing With Gentle Gathering
Lie on your side in a supported position. Take a full inhale into your back and sides, and on the exhale, gently allow your lower abs to softly gather inward. This is not a forceful contraction. The intention is to build awareness and begin reconnecting to reestablish good breathing and bracing patterns.
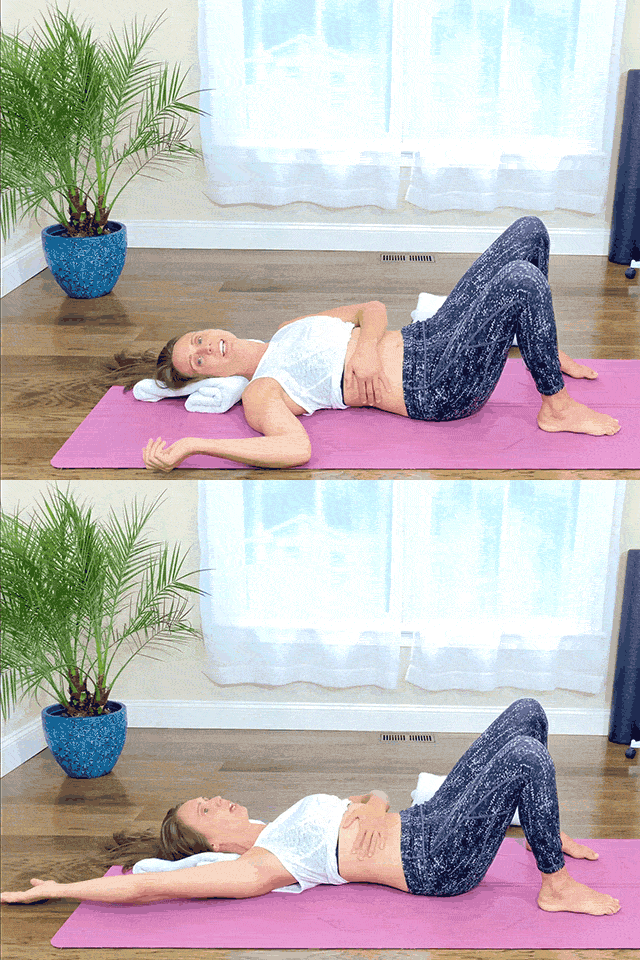
Scapula Squeezes and Angel Wings
Gentle postural work for the mid-back and shoulder girdle that helps to restore the rib cage position needed for effective breathing. Perform these in supine or comfortably seated as your core tolerates.
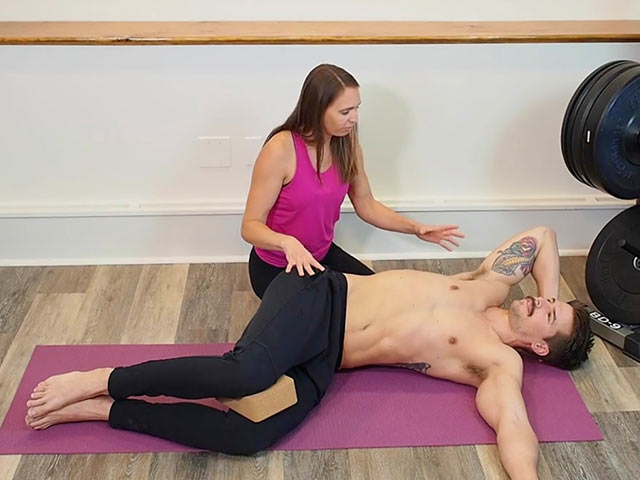
Open Book
Lie on your side with your knees and hips bent at 90 degrees and a pillow between your knees, then gently take your arm, shoulder blade, and torso back toward the ground without letting your top knee shift back. Return to the side-lying position. This should be a gentle thoracic mobility exercise. Again, start small with your range at first, and watch to avoid forcing yourself into the range by overarching your back and putting extra strain on the healing incision site.
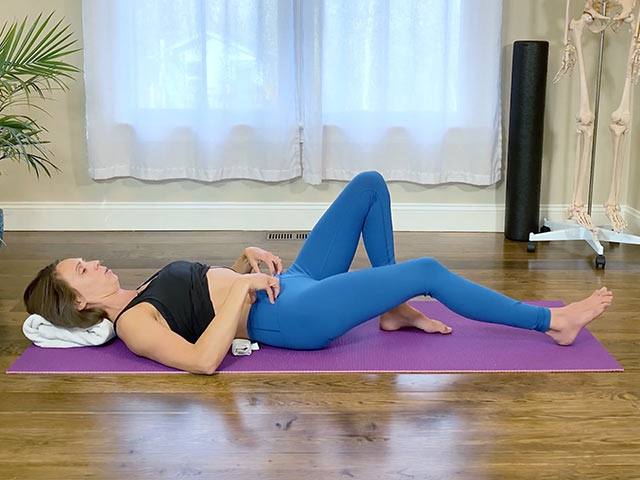
Heel Slides
Lie on your back with your knees bent, and slowly slide one heel out along the floor. Then return to the starting position, focusing on keeping your lower abs slightly engaged without allowing your pelvis to rock or tilt or any excessive pulling on your incision. Moving slowly allows you to feel when your pelvis wants to move so you can prevent it. This is a gentle transverse abdominal recruitment drill that also helps improve mobility in the front of your hips.
Rockbacks
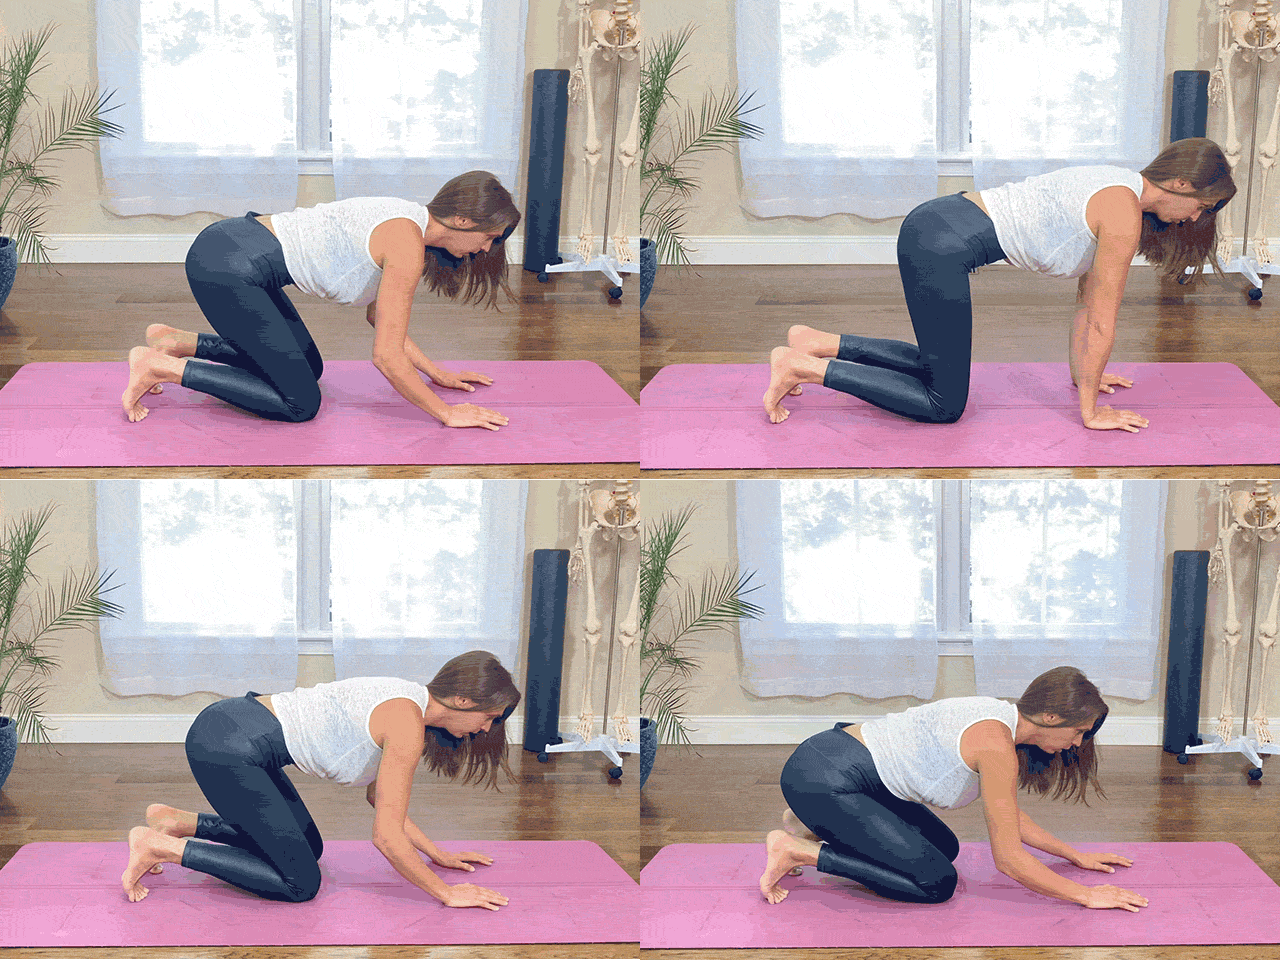
This is a great, gentle way to introduce spinal and pelvic stability while opening up the back of your hips. Start in a hands-and-knees position with a neutral spine. Push away from your hands (without letting them slide), so that you shift back into your hips. Feel your sit bones widen, and check that your pants line doesn’t tuck under or tip forward and your ribs don’t flare or tuck. Then push forward from your knees to return to the starting position.
Taking Short Walks
Progressively increasing your walking duration is appropriate and beneficial as long as it doesn't cause more soreness or pressure at the incision.
Standing Upright
You can use your hands on a surface to support you and provide a gentle push, but gradually work on standing upright by lengthening and opening up the front of your body.
What to avoid entirely during this phase:
Planks, sit-ups, push-ups, leg lifts, any exercise that creates strain or pulling through the incision, any high-intensity activities.
Weeks 4–9
Phase 2: Beginning Direct Core Work and Progressing Mobility
By weeks 4 to 6, once scar desensitization is underway and breathing patterns are improving, you can gently begin adding direct core exercises. Continue the previous mobility work as needed, and progress to exercises that place a higher demand on your lower abs and incision site as well as working on functional patterns.
The key principle is that every exercise is done with the exhale-driven bracing pattern established in the breathing phase: inhale to prepare, exhale (with a bottom-up gather), then move.
Leg Lifts
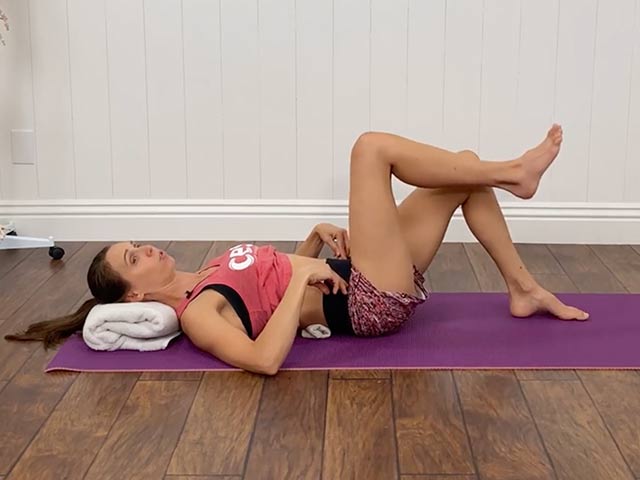
When the leg slides feel good, you can progress to a lower leg lift from the ground as tolerated. Focus on where you are driving the movement from, and pay close attention to stabilizing your pelvis. Lie on your back with your knees bent at 90 degrees and your feet on the ground. Inhale, and with a bottom-up gather on the exhale, slowly lift one leg up and then lower it back down. Make sure your spine and pelvis don’t move a millimeter. Alternate sides. If this feels easy, be suspicious: check that your lower abs are truly engaged, and not just your hip flexors or upper abs. The slower you move, the more you’ll feel the burn and be able to redirect any undesired movement.
Hands-and-Knees Breathing
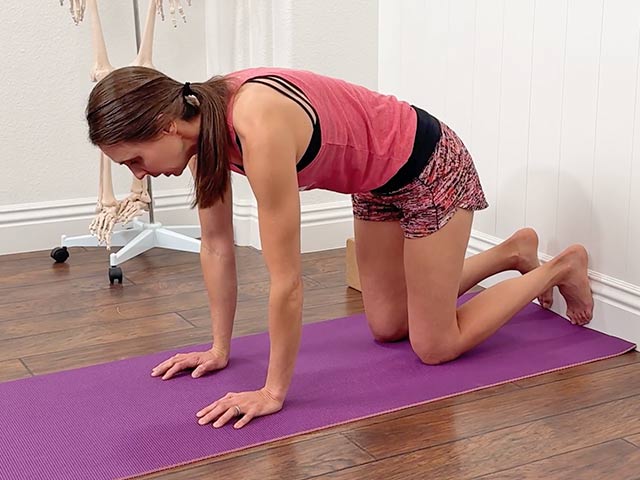
As Cat-Cow feels good, we can now work a bit more on intensity of engagement and endurance. In the hands-and-knees position, start in an extended Cat-Cow. Next, move into the rounded position, focusing on using your abs to tuck your pelvis under as you lift your abs and ribs back. Make sure to flex equally through your entire spine. Hold tension in your abs as you then inhale into your sides and back. Then exhale and round a bit further. Watch to make sure your chest doesn’t drop down toward your thighs and you’re not shifting forward or backward. Hold for 2-3 breaths, relax, and then repeat.
Hands-and-Knees Midback Rotation
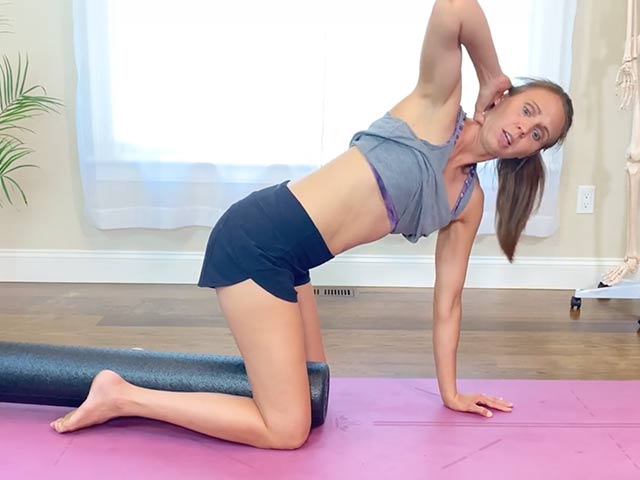
Take your thoracic rotation up a notch by further exploring hands and knees movement. Place a yoga block between your knees and one hand behind your head. Focus on turning your chest away from the ground by pushing your down hand away from your midline. Because your hand can’t move, your shoulder blade will turn away from your rib cage and rotate your mid back. You can finish the movement by squeezing your shoulder blade back on the hand behind your head for further chest opening and to incorporate more scapula work. Slowly rotate back toward the ground. Make sure your hips and pelvis don’t move as you rotate to isolate the movement to your thoracic spine.
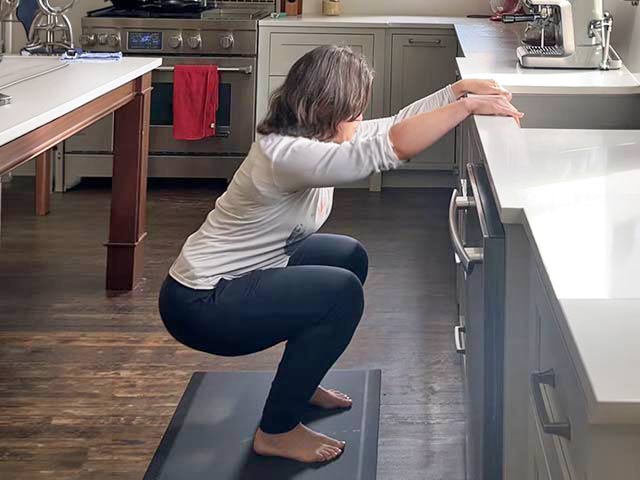
Assisted Squats
This takes the glute lengthening and lower body loading into a functional, upright activity while still supported. Hold onto a countertop as you sit back and down into your hips, letting your knees bend while keeping your weight evenly distributed in your feet. Inhale into your back, sides, and hips as you lower, and exhale from the bottom up as you push the ground away to stand back up. These can sometimes be introduced sooner (limiting range as needed) to encourage good daily squatting movements.
Weeks 9–14
Phase 3: Progressive Front-Loading and Rotation
As scar mobilization progresses and core control improves, you can begin to increase the challenge of full body exercises and gently introduce higher level front-loaded and rotational core exercises.
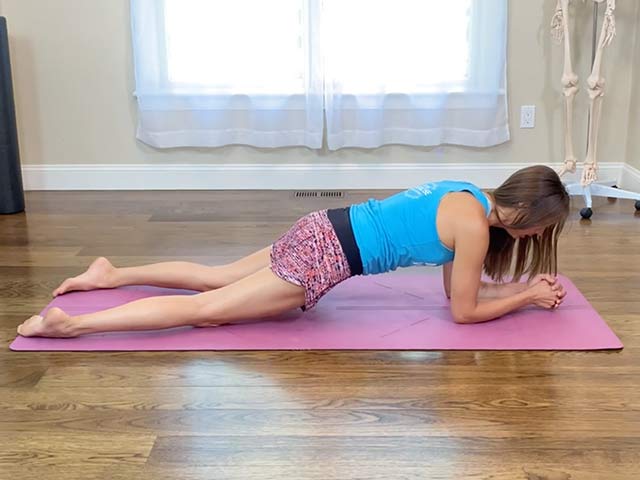
Front-Loading Progression
Begin planks from an elevated surface (hands on a counter or high bench) and progressively lower the surface as your strength and control improves, eventually working toward a floor plank. This lets you gradually manage the load on your abdominal wall. Check that you can maintain your breathing pattern and that the incision area is not pulling or tender.
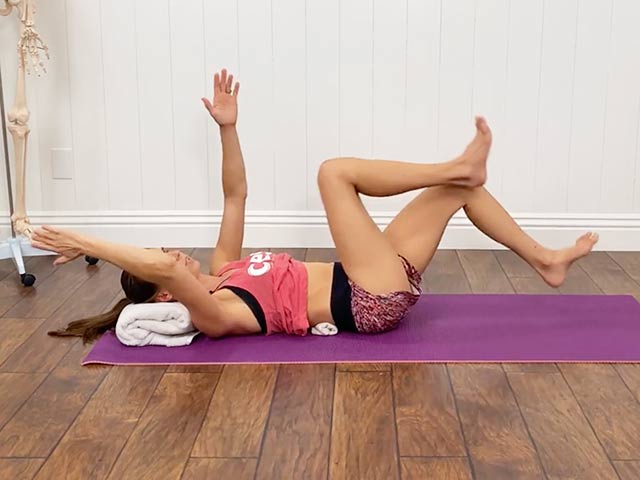
Deadbug Progression
When lifting one leg at a time off the ground feels good, you can progress to lifting one leg first and then raising the other to join it. Then lower them back down one at a time. Advance the exercise only as far as you can go without losing tension in your lower abs.
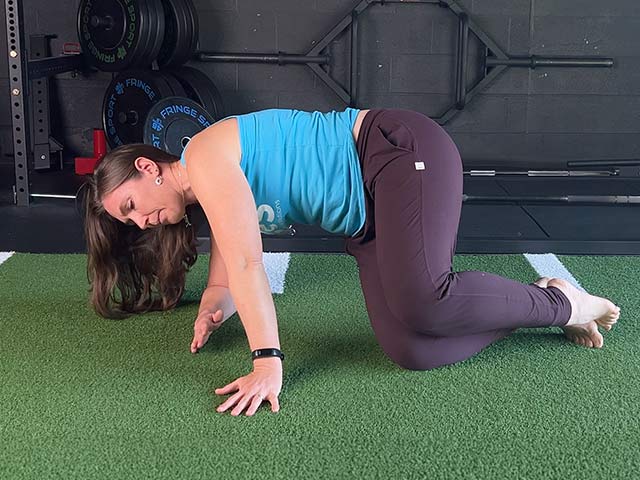
Side Plank Progression
Begin side planks from an elevated surface and progress to the floor. You can also start on the floor, but with a shortened lever. These are valuable for lateral core stability, which supports pelvic control. Focus on keeping ab tension while still getting a good inhale into your sides and back. Then exhale and feel your abs gather further to work on breathing under a brace for eccentric core control and endurance.
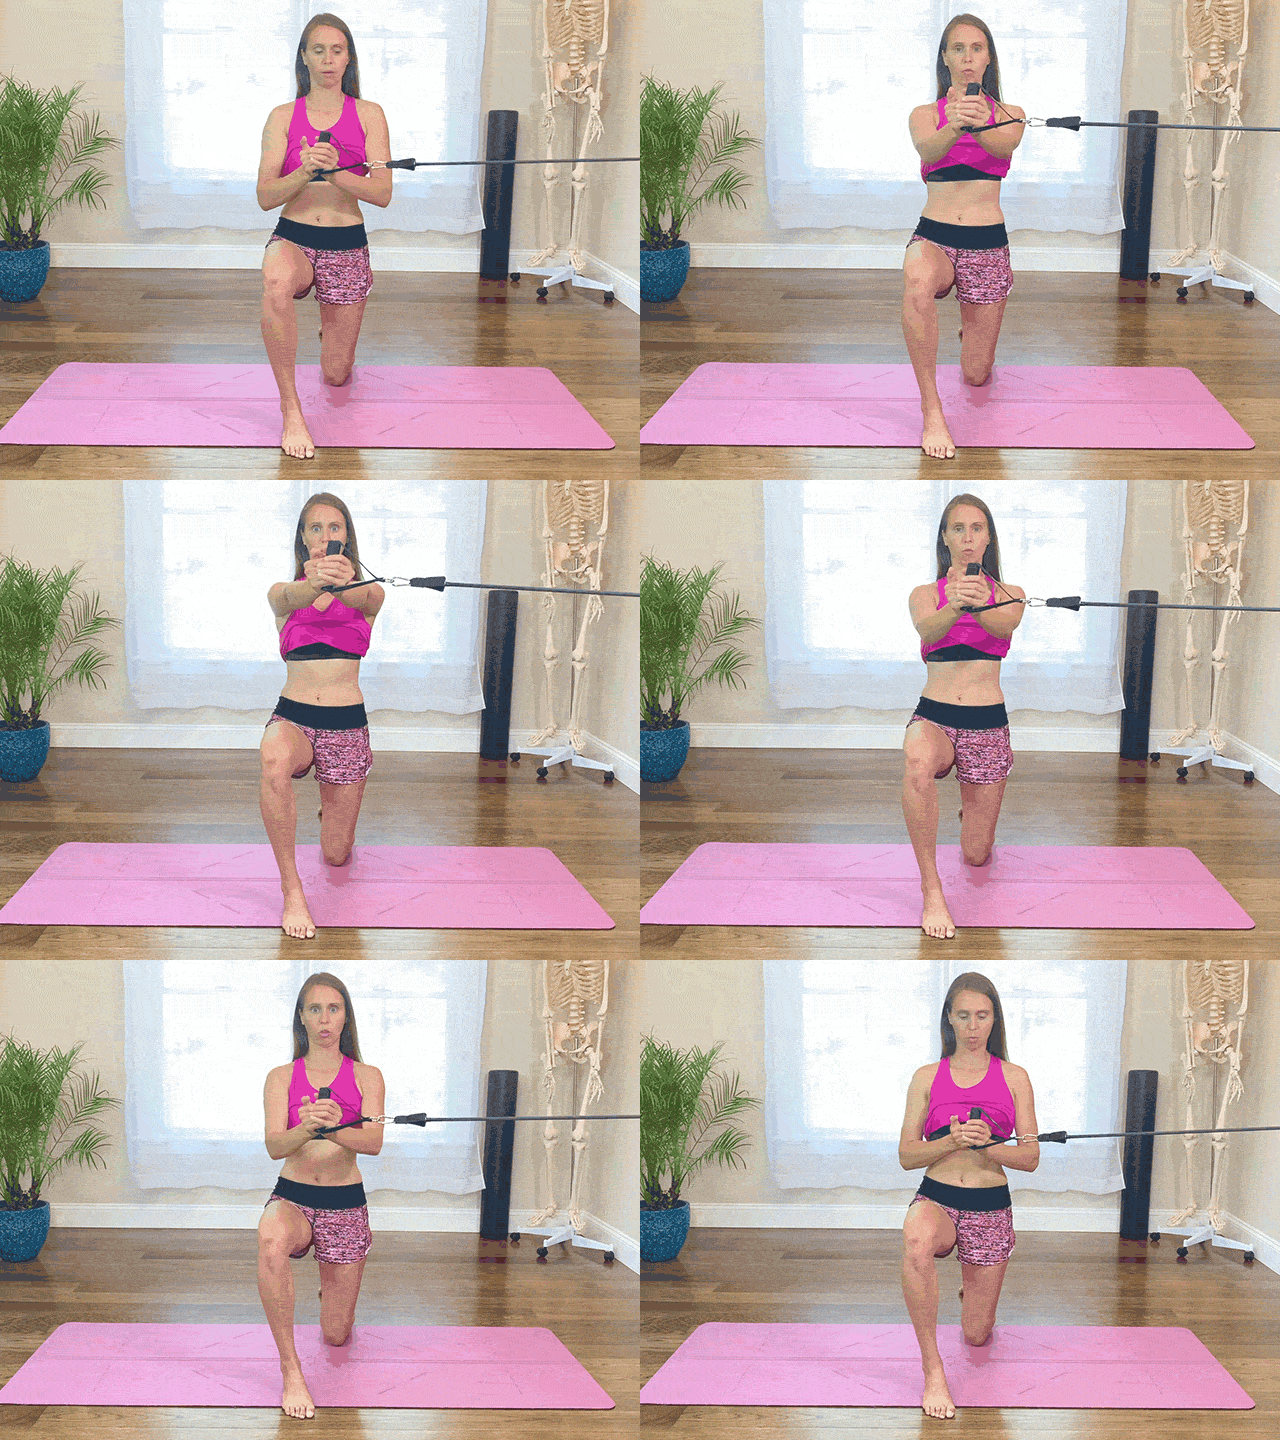
Pallof Press
This is an anti-rotation exercise that challenges the core to resist movement rather than creating it, which is how the core functions in daily life and sports.
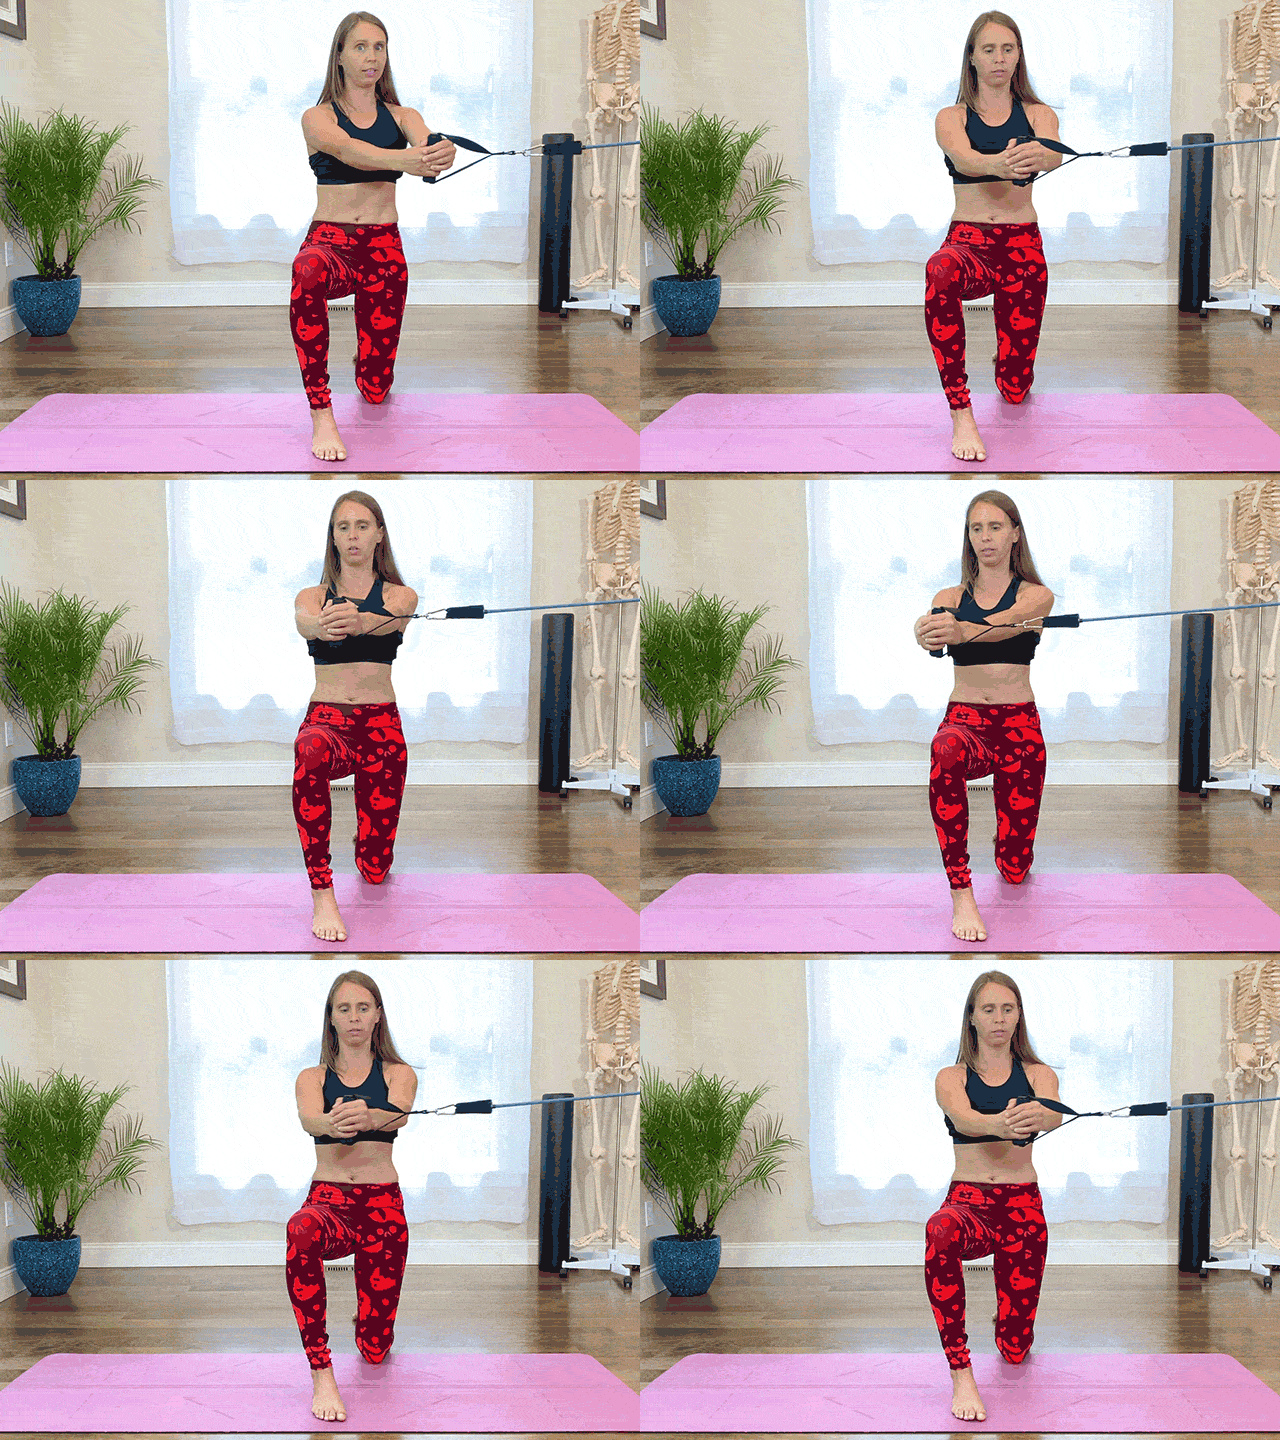
Half-Kneeling Rotations
Start loading your abs dynamically. Focus on finding balance between your internal and external obliques on the opposite sides as you rotate through your torso, then control the return. You might find that you need to focus on pulling yourself through the rotation with your internal obliques rather than pushing with the external obliques to help bias more strength to your lower abs.
Advanced Scar-Lengthening Exercises
Once range allows, gentle cobra or press-up movements can help to restore mobility through the anterior fascial line, which can tighten over time at the C-section scar. Eventually you’ll also want to progress this to loaded eccentric hip extension exercises such as reverse Nordics to challenge stability of your abs in the frontal plane while further lengthening hip flexors and anterior fascia under load.
Progress Lower and Upper Body Exercises into split squats, deadlifts, rows, chest presses, etc as tolerated, making sure you’re driving the movements from your lower body or upper body (and not your back or ribs) and maintaining good breathing and bracing strategies.
Beyond 14 Weeks
Returning to Higher-Load Activity
Functional tests (rather than calendar time alone) should guide your return to running, high-intensity exercises, plyometrics, and heavy lifting. Most women are not ready for these higher-demand activities until at least 12 to 16 weeks postpartum. Some can progress sooner, while others may benefit from waiting longer. It all depends on the individual.
Moving Forward
C-section recovery takes time, attention, and a framework. The six-week clearance is a starting point, not a finish line, and returning to full core strength requires working through the layers: scar tissue, breathing mechanics, foundational lower ab activation, and progressive loading. With the right phase-based approach, most women can rebuild a strong, functional core after a C-section, no matter how many weeks or months out they are. It's never too late to start the process.
If you're working with clients postpartum or looking to deepen your knowledge of corrective exercise for this population, the PCES certification covers C-section recovery, pressure management, diastasis recti, and pelvic floor rehabilitation in clinical depth.
Go deeper with the PCES certification
Free Pelvic Floor and Diastasis Recti Course
What You Need to Know About Pressure Management
🎥 6 Video Lessons | 🕓 97 Min | 📑 PDF Downloads
Working with pregnant and postpartum clients/patients?
This 6-part course offers key takeaways on breathing, pelvic floor strengthening and diastasis recovery. Sign up and start learning today!